





Karsten Wenzlaff, Advisor
August 26th, 2025
Karsten Wenzlaff is a Crowdfunding and Fintech Expert from Germany. He is Secretary-General of Digit[...]


Jun 8, 2026
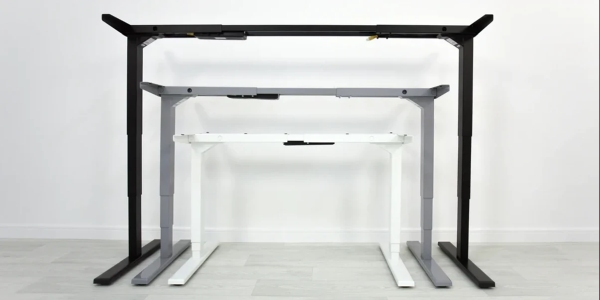
Building your own standing desk is one of those projects that seems more complicated than it is. The frame does the mechanical work. The desktop is just a surface. Put the right two together and you end up with a custom sit-stand desk that fits your exact dimensions, matches your workspace aesthetic, and costs less than most comparable products bought as a complete unit.
The frame decision is where most of the thinking needs to happen. Get that right and the rest of the project is straightforward.
Commercial standing desks come in a limited range of widths, depths, and surface materials. If your space is non-standard, if you want a specific wood species, a particular thickness, a reclaimed material, or dimensions that don't match what's on the market, building your own is the practical route.
The cost argument is also real. A quality motorised frame without a top is considerably less expensive than the same frame sold as a complete desk with a manufacturer's surface. If you already have a desktop you want to keep, or you're sourcing a slab of solid wood, the frame-only route saves money while improving the result.
Control over the finished product is the third reason. You know what you're getting: a specific frame with specific specifications, paired with a surface you chose rather than what was available in the product line.
Single-leg frames are compact and suited to smaller desktop sizes, typically up to around 120cm wide. The single column limits the maximum stable width but keeps the footprint minimal. For a compact home office setup or a secondary workstation, this configuration works well and costs less than a full two-leg frame.
Two-leg frames are the standard for most desktop sizes. Two columns, one at each end of the desk, provide stability across a wider span. Most two-leg frames accommodate desktops roughly between 100cm and 180cm wide, though the exact range varies by manufacturer. For a main workstation with multiple monitors and full equipment, this is typically the right starting point.
Three-leg and corner configurations support L-shaped or very large surfaces. These are more complex mechanically and more expensive, but they solve the stability problem that arises when a single straight frame is asked to support an unusually wide or non-rectangular top.
Motor configuration is the starting point. A single motor driving both columns through a crossbar is the entry-level approach. It works but introduces some flex between the columns during adjustment on wider desktops. Dual motors, one in each column, driven synchronously by the controller, produce more stability and more even lifting force distribution. For a desktop wider than about 140cm, or for anyone who wants the desk to feel genuinely solid at standing height, dual motors are worth the additional cost.
Height range needs to accommodate both the seated and standing positions of the person using it. The seated position is more constrained by the chair height and the working ergonomics. The standing position needs to allow the keyboard to sit at a height where elbows are roughly at 90 degrees while standing. Most people need a standing height somewhere between 100cm and 120cm. Check the frame's maximum extension against this requirement, and check the minimum against your preferred seated height, before buying.
Weight capacity for the standing desk frame needs to account for the combined weight of the desktop surface and everything on it. A solid wood slab can be heavy. Two monitors, a laptop dock, and accessories add up. Frames rated comfortably above the actual loaded weight will be more stable and last longer than those running near their limit.
Stroke speed affects the experience of using the desk in practice. A frame that adjusts at a reasonable pace, roughly 25 to 40mm per second, feels purposeful without being abrupt. Very slow frames make adjustment feel effortful. Very fast frames can feel slightly aggressive. Most quality frames in the mid-market land in a speed range that works well for daily use.
Controller quality is consistently the underspecified element. A controller with memory presets, the ability to save specific sitting and standing heights and return to them with a single button press, changes whether the desk gets adjusted regularly or sits at one height indefinitely. Manual height finding every time introduces just enough friction that most people stop bothering. Presets remove that friction entirely. This is worth specifying rather than accepting whatever comes with the cheapest frame option.
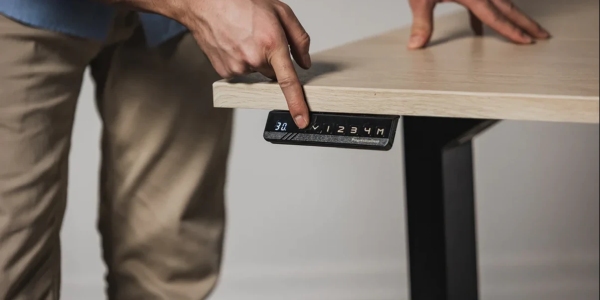
The frame's desktop compatibility specification typically gives a minimum and maximum width and depth range. The desktop needs to fit within this range for the frame to support it correctly.
Thickness matters for the mounting hardware. Most frame cross-beams use bolts that pass up through the frame into the desktop from below. A desktop that's too thin won't provide enough material for the bolts to grip. A desktop that's too thick may not work with the standard bolt lengths. Around 18 to 25mm is the typical practical range. A solid wood slab can be considerably thicker, which may require longer fasteners.
The stand up desk frame mounting pattern determines how the columns attach to the desktop. Most frames use a crossbar arrangement that spans between the two columns and attaches to the underside of the desktop at multiple points. The crossbar width is adjustable within a range, which is what allows the frame to accommodate different desktop widths.
For solid wood desktops, leave time for the wood to acclimatise to the room's humidity before mounting the frame. Wood moves with seasonal humidity changes, and a slab mounted while it's at one moisture content may develop tension or movement as conditions change.
Most two-leg motorised frames assemble in under an hour with basic tools. The columns attach to the crossbar or base beam, the controller and motor wiring connects through the columns, and the crossbar attaches to the desktop from below.
Cable management is worth planning before assembly rather than after. The desktop will have monitor cables, power, USB, and other runs that need to go somewhere. A cable tray mounted to the underside of the desktop along the back edge, and a cable spine or guide that allows wires to move with the desk during height adjustment without straining, keeps the setup clean and prevents cable damage over time.
Levelling the frame on the floor is the detail that gets skipped and then causes problems. A frame that isn't sitting level will put slightly unequal stress on the columns during adjustment. On hard flooring this is usually managed with the adjustable floor glides that most frames include. On carpet, the glides may need to be extended to compensate for compression. Spend two minutes checking this before loading up the desktop.
Running the anti-collision calibration, where the controller tests the range of travel and sets its limit positions, is a required step on most motorised frames and sometimes gets skipped by people who just want to use the desk. Do it. The calibration is what prevents the motor from running past its travel limits, which over time damages the drive components.
The result of getting all of this right is a desk that fits exactly where it needs to fit, carries the surface you actually wanted, and performs consistently for years. That combination is harder to get from a product catalogue than most people expect, which is what makes the frame-plus-custom-top route worth considering for anyone setting up a serious long-term workspace.
 The National Crowdfunding & Fintech Association (NCFA Canada) is a financial innovation ecosystem that provides education, market intelligence, industry stewardship, networking and funding opportunities and services to thousands of community members and works closely with industry, government, partners and affiliates to create a vibrant and innovative fintech and funding industry in Canada. Decentralized and distributed, NCFA is engaged with global stakeholders and helps incubate projects and investment in fintech, alternative finance, crowdfunding, peer-to-peer finance, payments, digital assets and tokens, artificial intelligence, blockchain, cryptocurrency, regtech, and insurtech sectors. Join Canada's Fintech & Funding Community today FREE! Or become a contributing member and get perks. For more information, please visit: www.ncfacanada.org
 |  |  |
|---|---|---|
 |  |  |



August 26th, 2025

January 4th, 2024

June 1st, 2021

September 9th, 2020

July 9th, 2018

January 3rd, 2018

September 25th, 2017

June 20th, 2017

May 10th, 2017

December 14th, 2016

Leave a Reply